
Firstly...3 posts in a week?! Crikey! I'm actually little proud of this. It's like I'm actually motivated!
Secondly, being ill has meant that I have actually had the time to have a browse of different blogs and get ideas for painting my nails in interesting ways. I came across Jane's website a few days ago and she has just got some AMAZING nail art on there! She does a lot of stamping but also as some great tutorials for "tape manis" Having looked through a lot of them and just being so inspired, I came across this tutorial for an Explosion Design Tape Mani which just looks amazing in the colours she'd done it in. I knew I really wanted to try this one out but didn't want to copy it colour for colour so, as I'm a bit of a nerd and was also watching a comic book inspired episode of one of my favourite shows (Psych) at the time, I went with some comic book inspired nail colour....Blue, Red and Yellow....total Superman colours and I <3 Superman! (Also it kind of reminds me of the retro Batman cartoons with the words "POW!" and "KABOOM!" in those speech type bubbles...love it!) Anyway, I highly recommend checking out her tutorial for a really easy to follow guide on how to do this simple but effective look. Here is my first attempt at it! Enjoy!

OK first up....the colours I used for the base colours:
Firstly we've got the Sally Hansen Miracle Cure base coat. Love this as it stregthens your nails as well as protecting them. It also dries pretty quickly too!
No7 Stay Perfect Nail Colour in 300 Stand Back - Really nice bright blue colour, absolutely perfect for this look! I mainly use the No7 colours for water marbling as their thinner consistency are perfect for that technique...however for this colour I found the thinner consistency a bit of a pain for actually just painting my nails. 3 coats were used on each nail. It is quite quick to dry though so I guess that's pretty good!
Eye Glam in Blue - I got this in Peacocks for £2.50 and it was such a good bargain! I have 3 glitter polishes from Peacocks and they are all fab! This one is a clear jelly type polish with tiny bits on blue and silver glitter but as the glitter is so dense it only takes two coats if you want a full cover glitter nail. Love it! Possibly one of my favourite nail polishes that I own (which is really good for £2.50 I think!)

The colours I used for the explosion details were:
17 Fast Finish in Knockout Red - This one came free in a set when I brought 2 17 products and I'm glad it did! I may have 2 other reds that are almost identical to this one but the "fast finish" claim is dead on. Also it only needs one coat to look effective (I would still use two but I think that's more habit then it really needing a second coat...)
Barry M Nail Paint in Red Glitter 150 - I've already raved about this glitter in this post so do head there for a more excited rave of it! However I will point out that the densely packed glitter made this an excellent choice for the look I had chosen.
Rimmel Lasting Finish 280 Sunshine - This polish is so bright! I got it mainly for summer really but it's perfect for the comic book theme too! It's got pretty good coverage for one coat but if I put this on as a block colour I always do two coats for perfect cover (however because of the light colour it can look a bit streaky before a top coat is applied.)
Models Own Nail Polish in Gold Rush - This was a freebie when you brought 2 other Models Own cosmetics. I really wanted two of the other polishes anyway so this was a nice freebie. (Incidentally it's also the first time I've ever seen a "try me" nail polish anywhere!) It's a clear polish with really really fine glitter in it and is lovely for just a bit of added bit of gold to a matte colour or you can layer it for a denser look. I think I'd always have to put a base colour under it as the glitter is so fine that you'd always be able to see a bit of normal nail underneath unless you put loads of layers on.
Sally Hansen Insta-Dri Top Coat - My go to top coat from now on. It really does dry quickly and is so shiny too! Love it! More info in this post.

So here are my nails with the No7 colour on. It's got two coats and I'll be honest I did these the night before as I didn't know I was going to actually do this look and just fancied blue nails! This was actually very helpful as it meant I was 100% sure they were dry and it meant tape didn't get stuck to the polish and lift it off. (Although I did fluff a nail up and have to redo it completely and I still didn't have the tape problem! Win!)

This step is explained MUCH better over at Nailside but basically you take a square of tape and cut it diagonally to create the points for you explosion design.

Ok so I know in the first picture of my nails I didn't have the blue glitter nail but when I woke up in the morning I decided I needed something else for my blue nails and went with the "glitter accent nail" look....then decided on the explosion one....I debated on removing the glitter but I'm really glad I kept it! This shows how I put the tape on (I used bog standard sellotape btw.) However as you can see from this picture, you can see the sellotape on my nail very well so I think I need to invest in some of that opaque tape (that is also a little less sticky I think.)

So fr the glitter nail I decided to go with an all out glitter look. This is after I've painted on the Barry M Red Glitter and then taken the tape off straight away. This was the top tip I learnt on Jane's website. I'd tried tape nail art before but it'd never worked and this was because I didn't realise that the lines are much crisper if you take the tape off straight away. I did each nail separately so it was easy to paint and then remove the tape quickly.

I then did the red on my thumb in the matte 17 colour. I then waited 2 minutes and used the fast dry top coat. After waiting about 5 minutes, I tentatively tried some tape on the red glitter and was grateful to find it dry so I then did the gold colour. I did the same with the yellow on the thumb but you can see when some of the yellow leaked a little at the top of the nail when I took the tape off. Doh!

I did the exact same on the other hand. Now then....for the thumb...well when I put the tape on the red I hadn't let it dry properly and it went completely wrong so this is my third (and final) attempt at it! I'm so pleased with how it finally turned out as I was getting so frustrated with the fact that I kept fluffing it up due to my impatience!

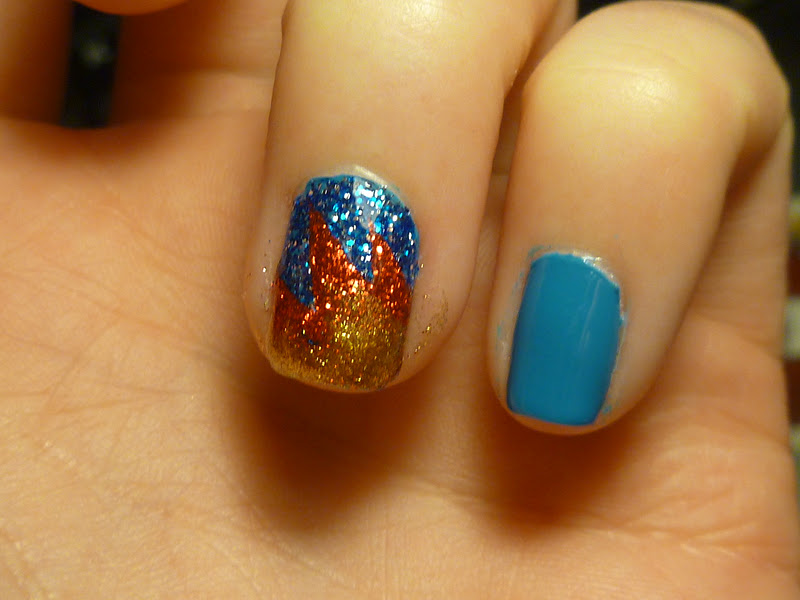
Close up of the ring finger on my right hand. Don't let the light fool you, the red and gold actually look much better in real life, they're just hard to capture on camera apparently!

Close up of my thumb on my right hand. Still needing a little clean up but I'm so happy with how this looks. It does look a bit raised but it's not that noticeable in real life.

My left hand in full. Obviously this one will probably be better as I am right handed so placing the tape was easier for me!
Again, the red and gold look more distinctive in real life. I really wish I could've captured the red better because I think it looks really great!

My thumb nail on my left hand. I did a little fixing with the yellow that leaked and you can just see the fix in the top right corner of my nail where I used a cocktail stick and some of the red polish to get rid of the yellow drip. It's hardly noticeable after I'd popped the top coat on it which was awesome!
I'm absolutely in love with these nails and this is a look I will be sporting for as long as I can. I will also definately try this look in different colours and ways. I'm so glad I found Jane's site because she has some really easy to follow tutorials (all with pictures) and I will be trying out lots of her other techniques too I think!
So what do you think? Hit or miss? Any colour combos you think would be great for this technique?
Until next time,
xoxo
No comments:
Post a Comment
Feel free to leave a comment, I love reading them and try to respond to all of them!